
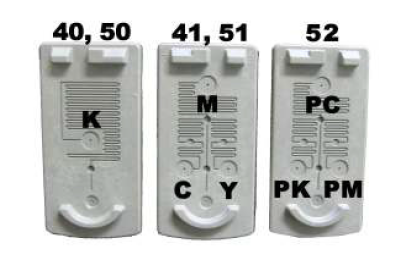
K= Black, C= Cyan, M=Magenta, Y=Yellow, PC=Photo Cyan, PK=Photo Black, PM=Photo Magenta
Procedure:
1. Remove cartridge label. Locate the vent holes on the top of cartridge.
2. Attach needle to syringe and load syringe with ink (5 ml for color ink, 20 ml for black). Use the small drill to enlarge in the hole.
3. Use a tooth pick to poke inside hole, verify the color sequence. Insert needle into correct cartridge ink hole. Make sure needle reaches to bottom of cartridge.
4. SLOWLY inject the ink into the cartridge. Stop if the ink begins to well up from the fill hole. DO NOT OVERFILL.
5. Clean off top of cartridge, un-tape the next fill hole and tape over the one just filled.
6. Repeat steps until all colors have been filled. Place scotch tape over the top of the cartridge so it covers every hole. Use a pin and put a small hole (vent hole) through the scotch tape for each hole on the top of the cartridge.
7. Clean off the cartridge. Re-insert the plugs.
Reinstall in printer and run one or two cleaning cycles until the cartridge begins to print correctly. Do not exceed three cleaning cycles.
PLEASE NOTE: Resetting the filing level indicator is unfortunately not possible with this type of cartridges. You can ignore the error message by selecting “OK”. Knowing that the ink level cannot be correctly determined anymore, please refill the cartridge as soon as you see faded colors. Should the cartridge print in streaks, first refill the cartridge, then start a cleaning cycle with your printer software. If the problem remains, fill a bowl with ½ inch of warm water (max temperature 90F) and soak the cartridge in it for 1 to 2 hours. Use an empty syringe without needle to pressure air from above into the openings. By doing so produce a high pressure within the ink chambers, and press the air bubbles out of the nozzle chamber.
If the printer stops you from printing because of low ink indicator, you can disable the indicator by following procedures:
Comments